
Using a servomotor with an ESP32 in Arduino code
(Updated at 01/04/2023)
Servo motors are a special form of motor that can be fixed at a precise angular position and held until a new instruction is given. TowerPro’s popular SG90 blue servo has a 1.5 kg/cm torque for only 9g. Its low cost and ease of control from an ESP32 make it a trendy choice for makers!
Note
Servos are very commonly used in RC cars, RC planes, robotics and the industry.
Getting started with the SG90 Servo
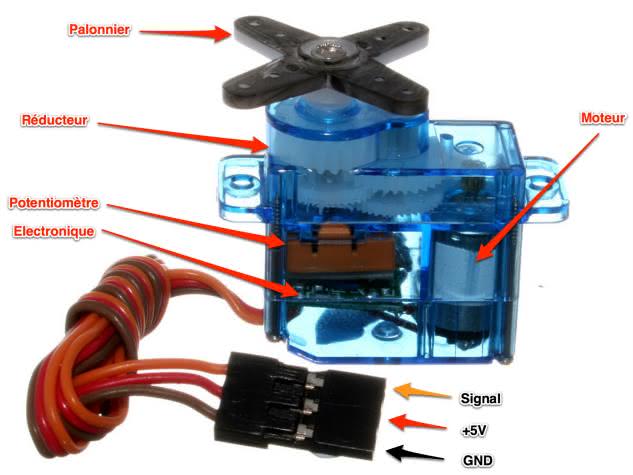
Unlike a conventional motor, most basic servo motors can only rotate between 0 and + 180 degrees. They consist of a DC motor, various gears to increase torque (and reduce speed) and a servo system, all packed into a tiny housing.
Warning
The plastic stop of the actuator, which limits the rotation, is relatively fragile. I advise you not to manually turn the axis of the servomotor to avoid forcing the stop.
How a servomotor works
This actuator can be controlled using a 50 Hz pulse width modulated (PWM) signal, which produces a pulse every 20ms. The position of the actuator can be adjusted by changing the pulse duration between 1 ms and 2 ms.

Note
The servo’s position can only be controlled with a PWM signal!
How to power the actuator with an ESP32
According to the datasheet of the SG90 servo, the optimal voltage is 5V. However, it also works with 3.3V (when idle).
Note
I advise you to use 5V (even if the example is with 3.3V) to have a more reactive servo!
Servo motors consume much power, especially when subjected to high torque. Since the pin 5V of most ESP32 boards is powered directly by the USB bus, the computer will limit it to around 500mA. With 1 or 2 servo motors connected, the USB supply should hold the load.
Once you exceed two servo motors, it is best to use a separate power supply. Be sure to connect a pin GND from the board to the negative terminal of the actuator power supply.
Warning
On uPesy’s ESP32 boards, the self-resetting fuse could trip if the current is too high.
Connecting the SG90 Servo to an ESP32
An SG90 servo motor contains three wires: 2 for the power supply and 1 for the PWM control signal. The colors of the wires allow us to differentiate them:
ESP32 |
Wire Color |
Servomotor SG90 |
|---|---|---|
|
Maroon |
|
|
Red |
|
|
Orange |
Signal |
Note
On some actuator versions, the color of the wire PWM is yellow or white instead of orange.
All output pins on the ESP32 can be used to control the servo motor. You can have 16 outputs PWM completely independent on the ESP32, which is the control of 16 servo motors! That should do it. 😊
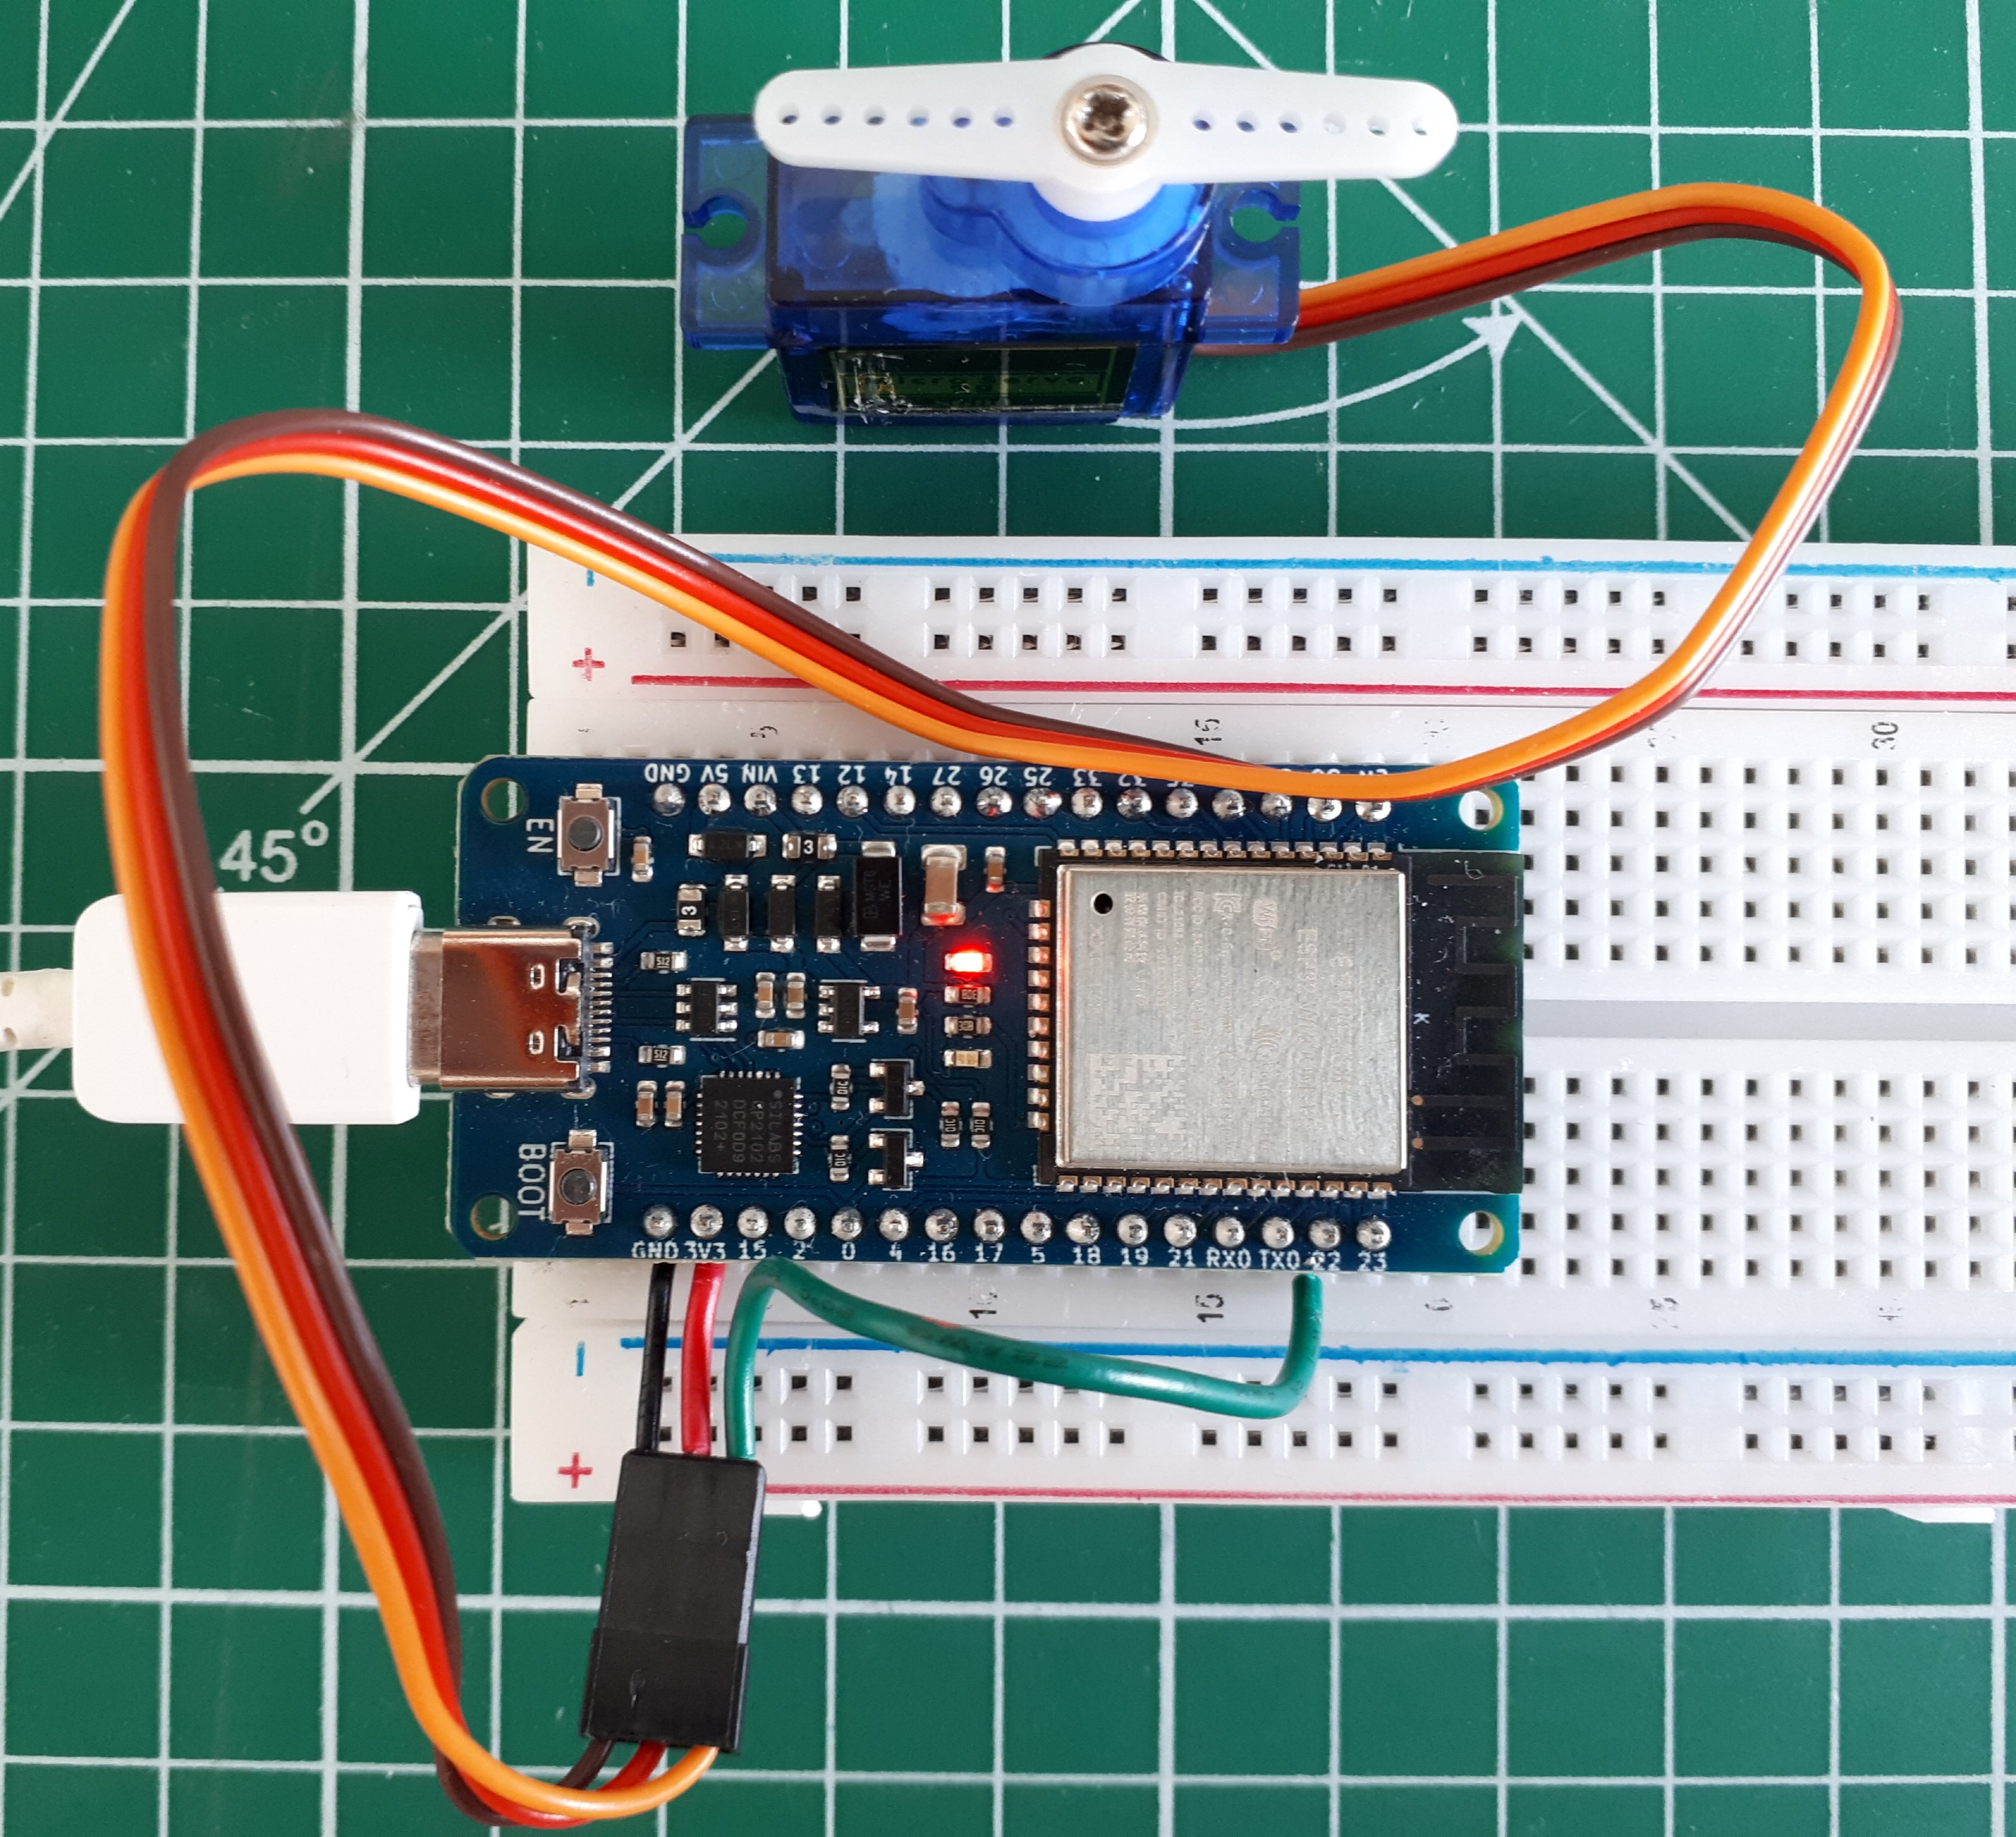
Circuit for driving a servomotor with an ESP32
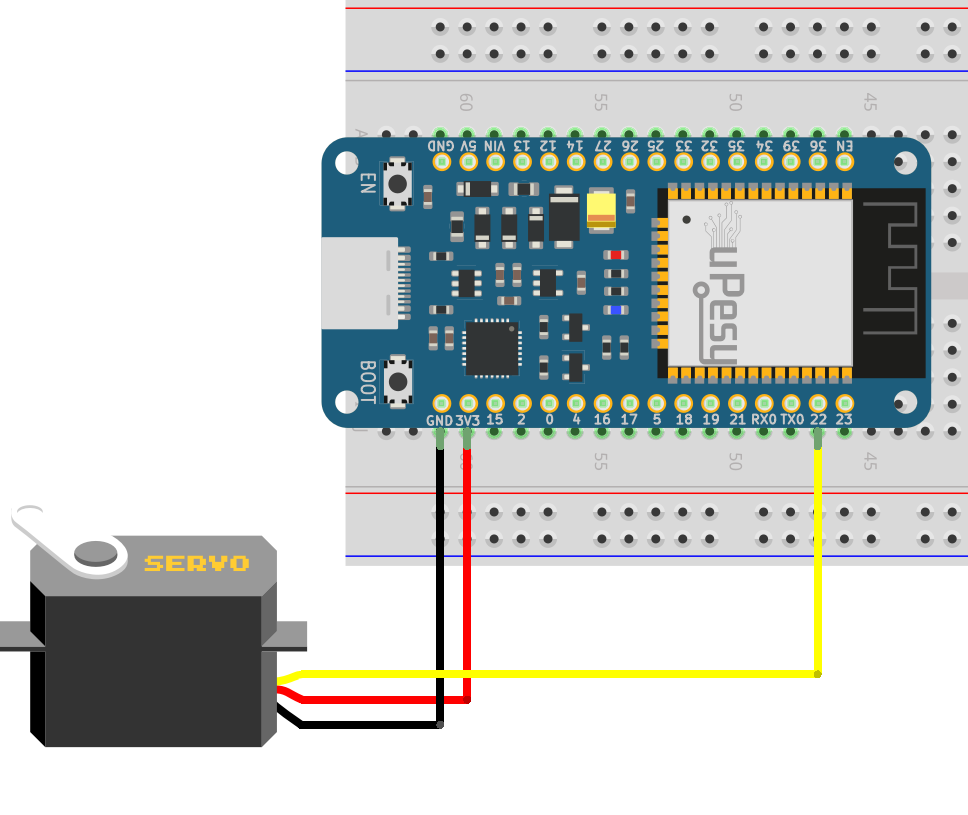
Here is an example on a breadboard with the uPesy ESP32 Wroom DevKit board, where the servo is powered with 3.3V.
Drive a servo motor from the ESP32 with Arduino code
We could dispense with using libraries to drive servomotors, but why reinvent the wheel when there are well-made and widely used libraries?
I propose you two different libraries which work correctly on the ESP32 :
ESP32Servo library , which works exactly as the
Servofor an Arduino board. Use this one if you already have a lot of Arduino code that you would like to reuse as is with an ESP32 board.ESP32-ESP32S2-AnalogWrite is a library that allows using all the features offered by the ESP32 boards at the PWM level, with practical support to drive servos. It also works with more recent ESP32 models (ESP32S2, ESP32C3…)
They are both available from the installer integrated into the Arduino IDE (Tools → Manage libraries ). Here is the procedure for the library ESP32Servo :

Drive the servo with the library ESP32Servo in Arduino code
Once the library is installed, we use the following code to drive the SG90 from 0° to 180° with the ESP32.
#include <ESP32Servo.h>
#define PIN_SG90 22 // Output pin used

Servo sg90;

void setup() {
  sg90.setPeriodHertz(50); // PWM frequency for SG90
  sg90.attach(PIN_SG90, 500, 2400); // Minimum and maximum pulse width (in µs) to go from 0° to 180
 }
void loop() {
 //rotation from 0 to 180°
  for (int pos = 0; pos <= 180; pos += 1) {
    sg90.write(pos);
    delay(10);
  }
 // Rotation from 180° to 0
  for (int pos = 180; pos >= 0; pos -= 1) {
    sg90.write(pos);
    delay(10);
  }
}
Here is a demonstration video with the above code:
Control the servo with the Arduino library ESP32-ESP32S2-AnalogWrite
The code is very similar to the other library.
Warning
Even if the library is called ESP32-ESP32S2-AnalogWrite you need to import the header pwmWrite.h .
#include <pwmWrite.h>
#define PIN_SG90 22 // Output pin used

Pwm pwm = Pwm();

void setup() {
}

void loop() {
//rotation from 0 to 180°
  for (int pos = 0; pos <= 180; pos++) {  // go from 0-180 degrees
    pwm.writeServo(PIN_SG90, pos);
    delay(10);
  }
// Rotation from 180° to 0
  for (int pos = 180; pos >= 0; pos--) {
    pwm.writeServo(PIN_SG90, pos);
    delay(10);
  }
}
Note
This library is very powerful for ESP32 and allows configuring many low-level things. I invite you to read the documentation of this one to see the extent of its possibilities.