
Discover MicroPython on the ESP32 with your first script
(Updated at 11/28/2022)
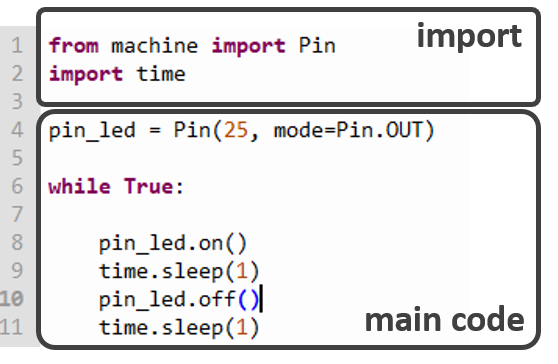
One of the easiest things to do on a new board is to make the built-in LED blink. It’s similar to the famous “Hello World” we display in the terminal when we discover a new programming language. Here is a script that makes the built-in LED of the ESP32 blink every second. The idea here is to show you an overview of programming in MicroPython.
from machine import Pin
import time

pin_led = Pin(2, mode=Pin.OUT)

while True:

    pin_led.on()
    time.sleep(1)
    pin_led.off()
    time.sleep(1)
Note
It’s best to know the basics of Python syntax before jumping into MicroPython.
Run the MicroPython script on your ESP32 board
First of all, make sure you have configured your IDE software for your board.
On Thonny IDE, it is better to save the code on the computer and not directly on the board. Thonny IDE will send the code directly to the MicroPython interpreter (via the REPL) when executing the script. To save the script on the board afterward, go to File → Save as…
You will notice that the Python script does not start automatically when the ESP32 is turned on . To solve this problem, you must save the script on the board with the name main.py . It’s not a concern in general during the development phase, but it is essential to know when using a MicroPython script on a board.
Warning
Be careful not to have opened the serial monitor of the Arduino IDE, otherwise you will be confronted with the following error PermissionError(13, 'Access is denied.', None, 5) :

Indeed, two software cannot access the same serial COM port simultaneously.
A detailed explanation of a MicroPython script
The layout of a MicroPython script is as follows:
Each MicroPython script starts with an import phase of the modules necessary for proper functioning. This is equivalent to the #include Arduino code for external libraries #include <SPI.h> , #include <SD.h> ..
The difference with MicroPython is that even the basic objects must be imported . As a reminder, Python is an object-oriented language: all elements in Python are considered objects. For example, the input/output pins of the boards will be seen and manipulated as objects MicroPython objects are used easily without being an expert in object-oriented programming.
In the example script, we import from the machine module the sub-module Pin . The module machine contains most of the objects specific to MicroPython . The module Pin object is, in fact, a class that defines the operation of an input/output pin (GPIO). This is why we create a pin_led which corresponds to the pin that controls the built-in LED. We define this pin as an electrical output. The object Pin , which we have created, has functions to modify its state .on() turns on the LED and .off() on turns off the LED.
Note
The integrated LED of the ESP32 is connected to pin number 2 (GPIO2)
We add a one-second delay with the sleep() function of the time module to see the blinking visually.
The code that makes the LED blink is in an infinite loop to blink… to infinity.
You will notice that if you used to use Arduino code, there are no more setup() and loop() functions: the script is executed once from bottom to top. So don’t forget the infinite loop to have a behavior similar to the Arduino sketch. A code is available to have the same structure as in Arduino code with a setup() and a loop() .
Different functions to pause a MicroPython script
from machine import Pin
import time

pin_led = Pin(2, mode=Pin.OUT)

while True:
    pin_led.on()
    time.sleep_ms(250)
            pin_led.off()
            time.sleep_ms(250)
In the code above, you will notice that time.sleep() has been replaced by time.sleep_ms() for more clearness. In fact, there are 3 functions that allow you to stop the program for a certain period, each with a different precision level:
time.sleep(duration_in_seconds)
time.sleep_ms(duration__milliseconds)
time.sleep_us(duration__microseconds)
Note
1 second = \(10^3\) milliseconds = \(10^6\) microseconds
Thus these three lines will block the program for 5 ms:
time.sleep(0.005)
time.sleep_ms(5)
time.sleep_us(5000)
Note
As for the Arduino code, these functions block the program: it cannot run any other tasks in the background like detecting the pressure of a button and measuring voltages.
You could see an overview of the programming of ESP32 boards with MicroPython. I hope this has made you want to discover more about this new language. I encourage you to read a more detailed tutorial on I/O management with MicroPython with a concrete example at the end.