
How to use the DHT22 sensor with the Raspberry Pi Pico board in Python?
(Updated at 01/05/2023)
The DHT22 is an advanced version of the famous and inexpensive temperature and humidity sensor DHT11, used in many DIY projects. It offers greater accuracy than its predecessor but has the identical drawback: few measurements per second: only 1 measurement every 2 seconds. Despite this, it is perfectly suitable for creating a DIY IoT weather station.
Note
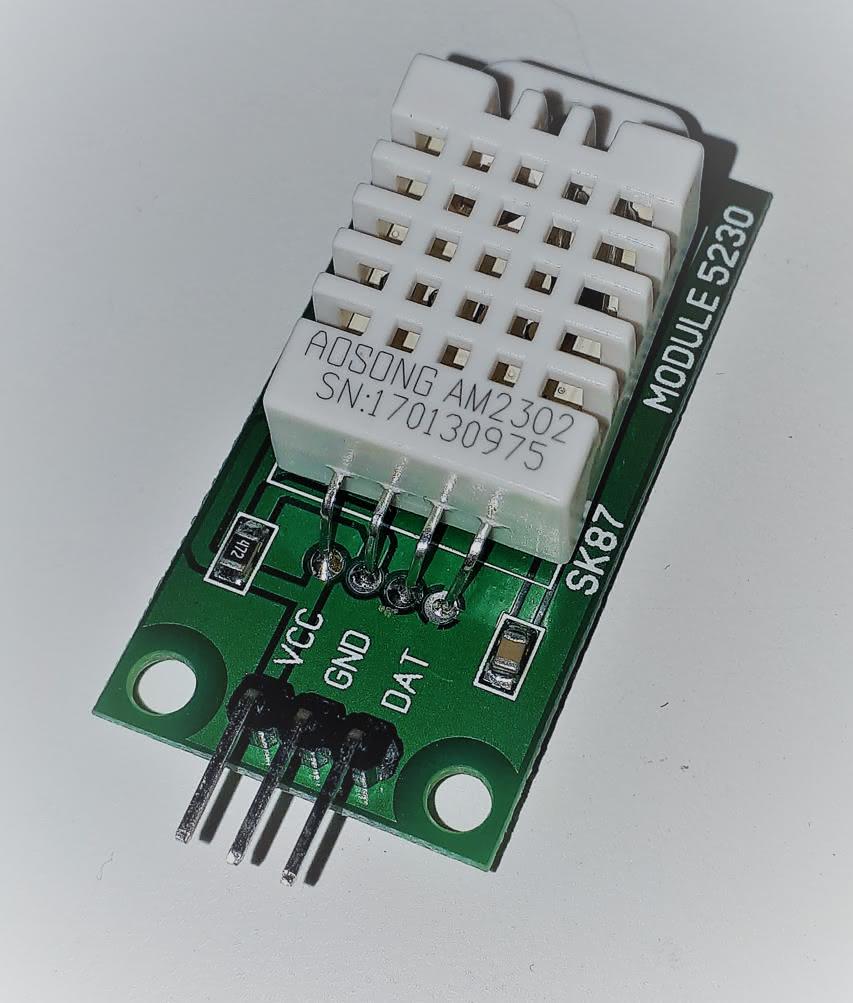
The DHT22 is sometimes referred to as AM2302
Getting started with the DHT22 sensor
The DHT22 is part of the DHTxx family. A comparison between the DHT11 and the DHT22 is available to see their differences better. The DTH22 has a white plastic housing, while the DHT11 has a blue one. If your sensor is blue, I recommend reading the DHT11 tutorial .
Some characteristics of the DHT22 sensor
The DHT22 can be directly powered by 3.3V, which is very convenient for the Pi Pico, which operates on 3.3V.
Note
The DHT22 is a better choice for monitoring temperatures outdoors than the DHT11 since it can measure temperatures down to -40°C.
The DHT22’s performance isn’t as good as that of Bosh’s BMExxx sensors, which makes it suitable for specific applications but not others. It all depends on what you need the sensor to do.😉
Connections of the DHT22 sensor
The DHT22 sensor typically has 4 pins, although some modules may expose only 3. It is essential to be aware that the pin-out of the DHT22 module will vary depending on the manufacturer.
When it comes to numbering the pins of a sensor, you should begin counting from the left while holding the sensor so that the grid is facing you. The first pin is always the power supply, while the others may vary.
The DHT22 is a temperature and humidity sensor with only one pin to transmit data in addition to the power supply.
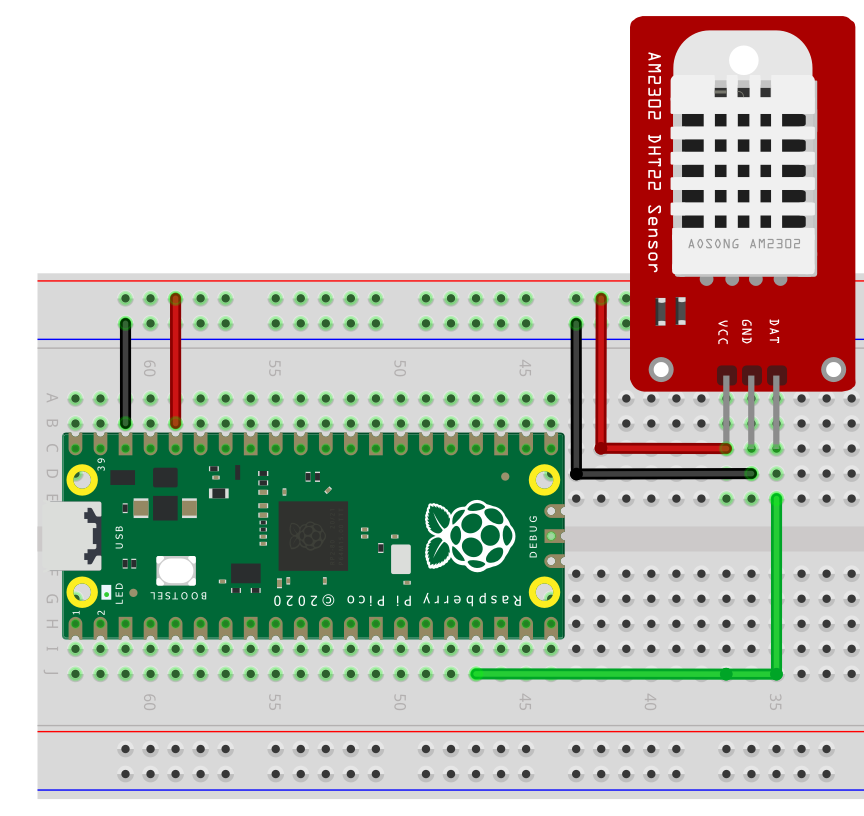
Wiring diagram for using the DHT22 module with an RPi Pi Pico
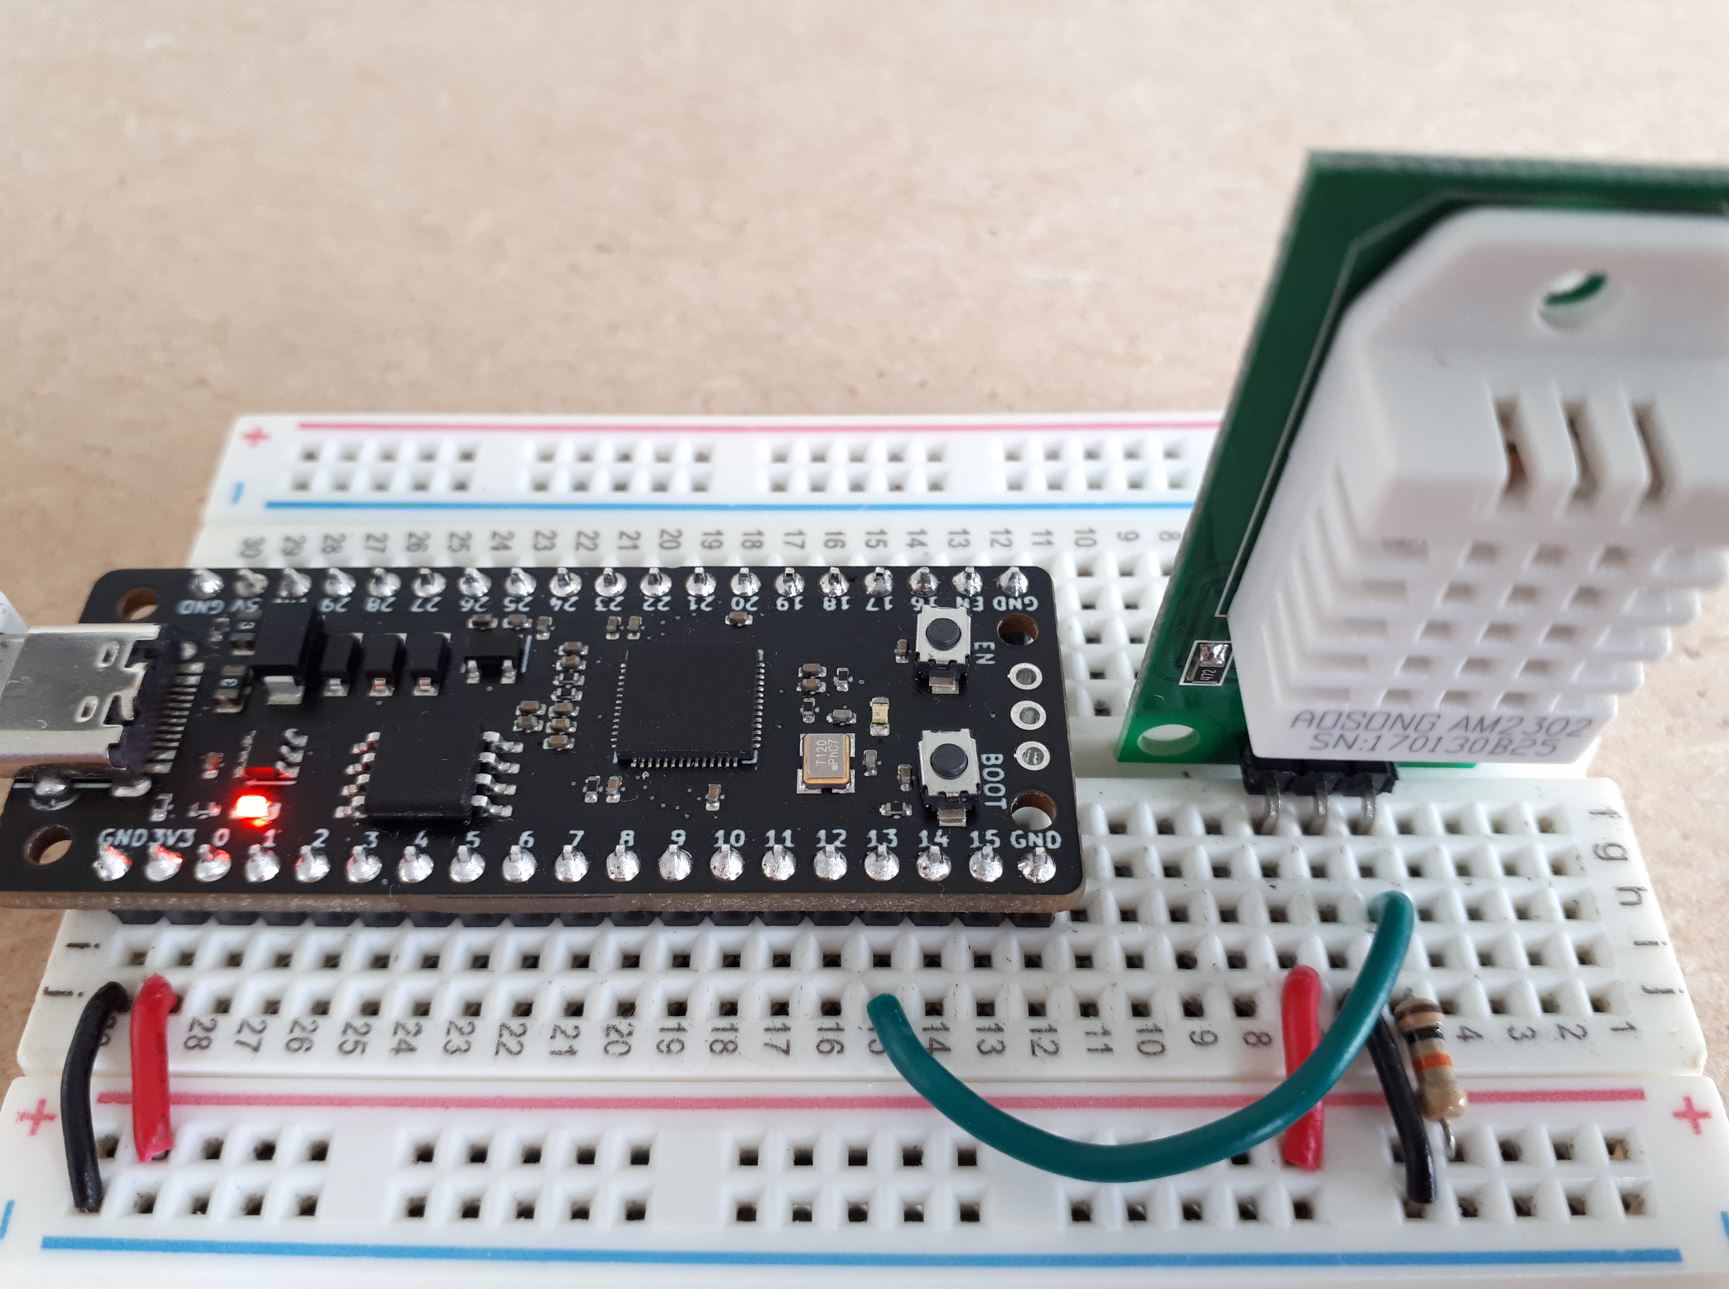
If your module does not include a pull-up resistor, adding one between the pins 3V3 and the signal (GP13 ) is necessary. The recommended range for this resistor is from 4.7kΩ to 10kΩ. Any output pin can be used, but in this example, we are using the GP13 . Make sure to adjust the circuit to your model if it differs slightly. 🙂
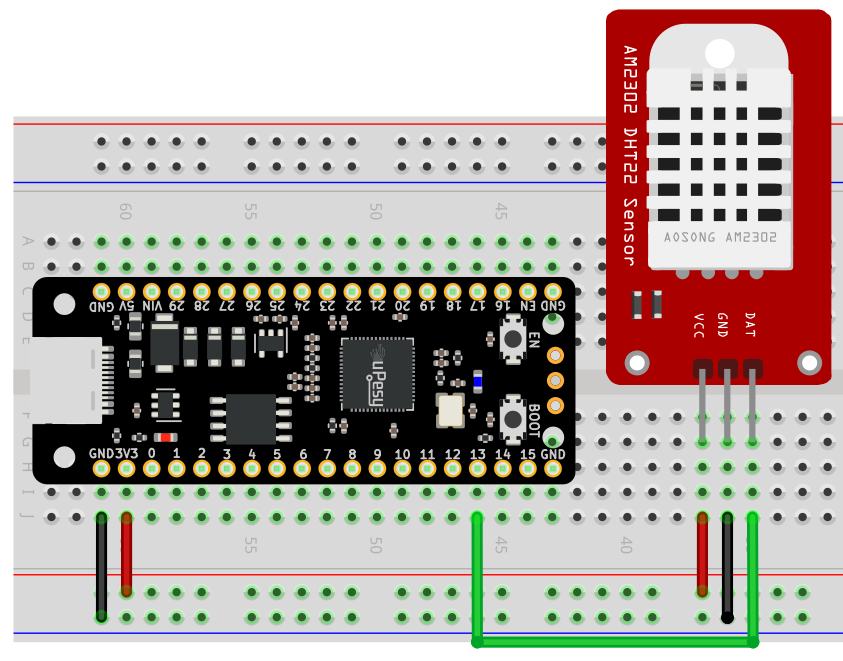
Here is an example with the uPesy RP2040 DevKit board, an upgraded Pico and a DHT22 module with the signal pin on the far right:
Measuring the temperature and humidity on the DHT22 module with MicroPython
Since DHT22 uses a proprietary protocol, it is necessary to use a library to communicate with the sensor. Fortunately, such a library is included in the latest versions of MicroPython, so you don’t need to download an additional one. You can directly import the module with import dht .
from machine import Pin
from time import sleep
import dht

sensor = dht.DHT22(Pin(13))

while True:
  try:
    sleep(1)     # the DHT22 returns at most one measurement every 2s
    sensor.measure()     # Recovers measurements from the sensor
    print(f"Temperature : {sensor.temperature():.1f}°C")
    print(f"Humidite    : {sensor.humidity():.1f}%")
  except OSError as e:
    print("Failed reception")
In the Thonny IDE terminal, you will see the temperature expressed in °C and the humidity in percentage.
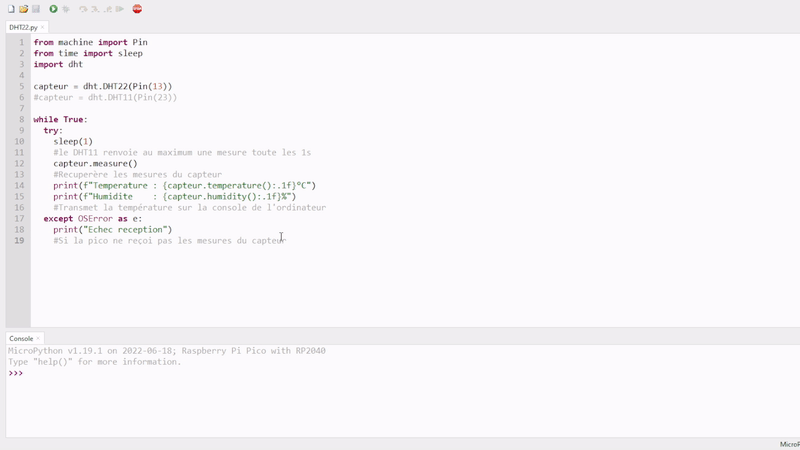
In Python, you can use f-string to display variables with a text, for example, f"Humidite: {sensor.humidity():.1f}" . The string must start with an f , and the variable must be placed between square brackets. It is possible to specify the number of digits after the decimal point, which will be displayed with :.1f . Here, we put a figure after the decimal point because the sensor is accurate to 0.5°C.
Calculate the heat index | Real feel temperature
The heat index can calculate the temperature felt. It is a value in °C based on the temperature and the relative humidity in the air. The higher the humidity level in the air at a given temperature, the higher the temperature felt
The formula is a bit long 😨 :
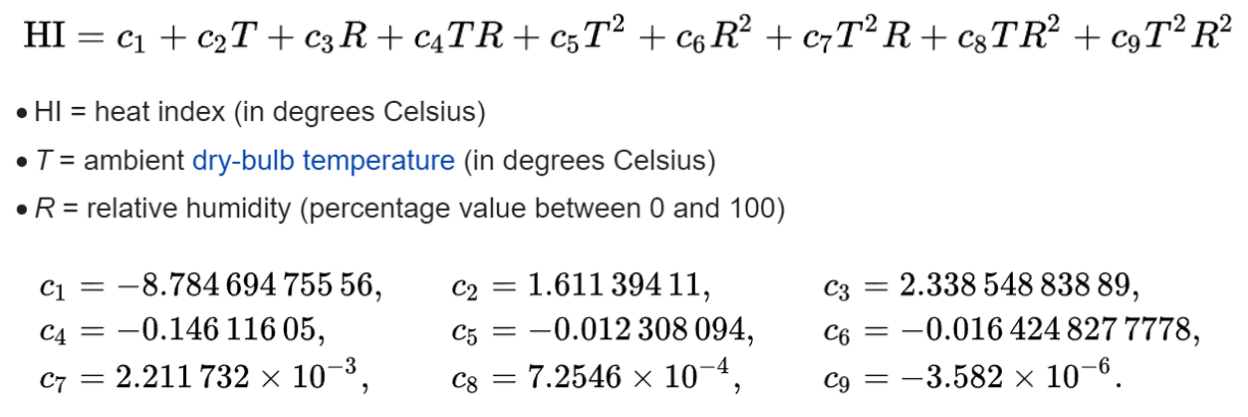
Fortunately, I have made a ready-made function that takes care of it: 😉
from machine import
This section is available to premium members only. You still have 67% to discover.
Subscribe for only 5$/monthAlready subscribed? Sign in