
Using the PSRAM
(Updated at 12/23/2022)
This article explains how to use the additional external RAM (PSRAM) present on some ESP32 boards ( uPesy ESP32 Wrover DevKit , TinyPICO ) with the Arduino language and the ESP-IDF Framework.
Overview and usefulness
Since the internal RAM of microcontrollers is relatively low, one can add extra external RAM to have even more. Even if the ESP32 is a microcontroller with a lot of RAM, it may not be enough, especially when you want to manipulate large files (JSON, HTML …)
PSRAM is an additional external 4 MB RAM that is present in some ESP32 modules:
ESP32-WROVER-B
ESP32-WROVER-I
The ESP32 communicates with the PSRAM by the SPI protocol. This is why it is also called SPI RAM. The 3rd SPI bus of the ESP32 is used to communicate with the flash memory (which contains the program) and with the PSRAM.

Note
There is an ambiguity about the actual amount of memory in the PSRAM. The actual capacity of the PSRAM (on the silicon chip) is not 4 MB but 8 MB. However, only 4MB can be easily accessed by the software. Using the 8 MB of PSRAM is quite complex but possible . This said, 4 MB of additional RAM is already massive (8 times the internal RAM)!
The advantage of an external RAM is relieving the internal RAM for the temporary storage of essential data.
For example, we can with the PSRAM:
Handle entire web pages
Handling large JSON files
Making a powerful web server
Create and manipulate huge arrays
Read and handle large files from the SPIFFS or SD card
How to use it?
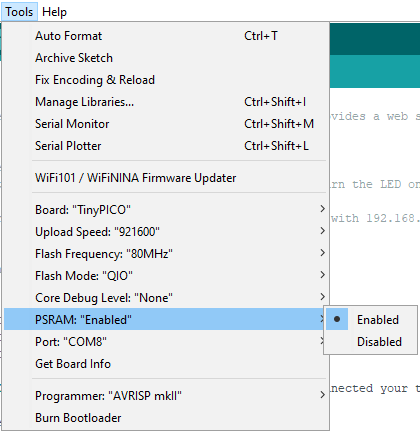
On the Arduino IDE, to use the PSRAM, you have to select a compatible board, for example, the ESP32 Wrover Module, which will work for all ESP32 boards with a PSRAM.

If you are using a board in the list, for example, the TinyPICO board , check that the PSRAM is activated.
Warning
The PSRAM does not appear in the ESP32 memory table, so it is expected that the size of the RAM indicated on the Arduino IDE or PlateformIO is always 327 Kb. There is a clear separation between the internal RAM of the ESP32 (327 KB) and the external RAM (4 MB).

To use PSRAM, you can either use libraries that support PSRAM or do dynamic allocations yourself to create arrays, and buffers, download HTLM files, JSON …
Arduino / ESP32 libraries
To avoid the headache of dynamic allocations, some Arduino libraries (compatible with ESP32) support PSRAM. The best known is ArduinoJson , which allows us to manipulate JSON files on Arduino and ESP32 easily.

ArduinoJSON
If you don’t know ArduinoJson yet, read this tutorial to install and learn how to use the ArduinoJson library . To use the PSRAM with ArduinoJson, you have to create a specific JsonDocument that you place before the setup() function :
struct SpiRamAllocator {
        void* allocate(size_t size) {
                return ps_malloc(size);

        }
        void deallocate(void* pointer) {
                free(pointer);
        }
};

using SpiRamJsonDocument = BasicJsonDocument<SpiRamAllocator>;
Then we use the SpiRamJsonDocument as a standard DynamicJsonDocument :
SpiRamJsonDocument doc(100000); //100 KB here
deserializeJson(doc, input);
Here is an example that downloads a 65 KB JSON file. The JSON contains the results of the search “ESP32 JSON” on Google.
Exemple
#include <WiFi.h>
#include <HTTPClient.h>
#define ARDUINOJSON_DECODE_UNICODE 1
#include <ArduinoJson.h>

//WiFi
const char *ssid = "WiFi name";
const char *password = "WiFi password";

const char *url = "https://raw.githubusercontent.com/uPesy/ESP32_Tutorials/master/JSON/bigJsonExample.json";

struct SpiRamAllocator {
        void* allocate(size_t size) {
                return ps_malloc(size);

        }
        void deallocate(void* pointer) {
                free(pointer);
        }
};

using SpiRamJsonDocument = BasicJsonDocument<SpiRamAllocator>;


void setup(){
        delay(500);
        psramInit();
        Serial.begin(115200);
        Serial.println((String)"Memory available in PSRAM : " +ESP.getFreePsram());

        //Connect to WiFi

        WiFi.begin(ssid, password);
        while (WiFi.status() != WL_CONNECTED){
                delay(100);
                Serial.print(".");
        }

        Serial.print("\nWiFi connected with IP : ");
        Serial.println(WiFi.localIP());

        Serial.println("Downloading JSON");
        HTTPClient http;
        http.useHTTP10(true);
        http.begin(url);
        http.GET();

        SpiRamJsonDocument doc(100000); //Create a JSON document of 100 KB
        DeserializationError error = deserializeJson(doc, http.getStream());
        if(error){
                Serial.print("deserializeJson() failed: ");
                Serial.println(error.c_str());
        }

        http.end();
        Serial.println((String)"JsonDocument Usage Memory: " + doc.memoryUsage());


        for (int i=0; i!=10;i++){
                Serial.println("\n[+]");
                Serial.println(doc["items"][i]["title"].as<String>());
                Serial.println("------------------------------");
                Serial.println(doc["items"][i]["snippet"].as<String>());
                Serial.println("------------------------------");
                Serial.println((String) "URL : " + doc["items"][i]["link"].as<String>());

        }
}

void loop(){
}
Serial monitor:
Memory available in PSRAM: 4194252
..............
WiFi connected with IP: 192.168.43.7
Downloading JSON
JsonDocument Usage Memory: 62515

[+]
Installing ESP32 in Arduino IDE (Windows, Mac OS X, Linux ...
------------------------------
Installing ESP32 Add-on in Arduino IDE Windows, Mac OS X, Linux open. Enter
https://dl.espressif.com/dl/package_esp32_index.json into the "Additional Board ...
------------------------------
URL : https://randomnerdtutorials.com/installing-the-esp32-board-in-arduino-ide-windows-instructions/

[+]
ESP32: Parsing JSON – techtutorialsx
------------------------------
Apr 26, 2017 ... The objective of this post is to explain how to parse JSON messages with the
ESP32 and the ArduinoJson library. Introduction The objective of ...
------------------------------
URL : https://techtutorialsx.com/2017/04/26/esp32-parsing-json/

...
See my Instructable, which explains how you use Google Search on an ESP32 and display the result on the serial monitor.

See also
How to use the external RAM on the ESP32 on the official ArduinoJson website
Arduino Framework
To store variables in the PSRAM, it is necessary to make dynamic allocations with specific functions for the PSRAM of the ESP32.
Note
It is not necessary to have advanced knowledge of C / C ++ to use PSRAM! Knowledge of pointers and dynamic allocation functions like malloc() or calloc() is a plus, but the proposed examples are sufficient on their own to use PSRAM in electronic projects.
The main functions to be used are the following psramInit() , ESP.getFreePsram() , ps_malloc() ou ps_calloc() et free() .
The psramInit( ) function is used to initialize the PSRAM, the ESP.getFreePsram() function returns the amount of memory available in the PSRAM. The three other functions are used for dynamic allocation.
Examples
This section provides examples of how to use PSRAM. They allow you to understand how to use the functions mentioned above. It is not necessary to understand everything to be able to use PSRAM. You must modify the values in the examples to use them in your projects.


Variables
This example shows how to create variables that are stored in PSRAM:
//Create an integer number
int *var_int = (int *) ps_malloc(sizeof(int));
*var_int = 42;

//Create a float number
float *var_float = (float *) ps_malloc(sizeof(float));
*var_float = 42.42;
Here’s the full sketch:
Example
void setup() {
Serial.begin(115200);
//PSRAM Initialisation
if(psramInit()){
        Serial.println("\nThe PSRAM is correctly initialized");
}else{
        Serial.println("\nPSRAM does not work");
}

//Create an integer
int *var_int = (int *) ps_malloc(sizeof(int));
*var_int = 42;

//Create a float
float *var_float = (float *) ps_malloc(sizeof(float));
*var_float = 42.42;

Serial.println((String)"var_int = " + *var_int);
Serial.print("var_float = ");
Serial.println(*var_float);
}
Terminal output:
The PSRAM is correctly initialized
var_int = 42
var_float = 42.42
Arrays
For arrays, the syntax is very similar:
//Create an array of 1000 integers
int n_elements = 1000;
int *int_array = (int *) ps_malloc(n_elements * sizeof(int));
//We access array values like a classic array
int_array[0] = 42;
int_array[42] = 42;
int_array[999] = 42;
Here is the complete sketch to create an integer array of 1000 elements stored in the PSRAM:
Example
int n_elements = 1000;

void setup(){
        Serial.begin(115200);
        //Init
        if(psramInit()){
        Serial.println("\nPSRAM is correctly initialized");
        }else{
        Serial.println("PSRAM not available");
        }

        //Create an array of n_elements
        int available_PSRAM_size = ESP.getFreePsram();
        Serial.println((String)"PSRAM Size available (bytes): " + available_PSRAM_size);

        int *array_int = (int *) ps_malloc(n_elements * sizeof(int)); //Create an integer array of n_elements
        array_int[0] = 42;
        array_int[999] = 42; //We access array values like classic array

        int available_PSRAM_size_after = ESP.getFreePsram();
        Serial.println((String)"PSRAM Size available (bytes): " + available_PSRAM_size_after); // Free memory space has decreased
        int array_size = available_PSRAM_size - available_PSRAM_size_after;
        Serial.println((String)"Array size in PSRAM in bytes: " + array_size);

        //Delete array
        free(array_int); //The allocated memory is freed.
        Serial.println((String)"PSRAM Size available (bytes): " +ESP.getFreePsram());
}

void loop() {
}
Terminal output:
PSRAM is correctly initialized
PSRAM Size available (bytes): 4194252
PSRAM Size available (bytes): 4190236
Array size in PSRAM in bytes: 4016
PSRAM Size available (bytes): 4194252
Note
The size in bytes of the array is 4016 for an array of 1000 integers (int). The int type is coded on 4 bytes. So there are 4 * 1000 bytes occupied by the array, and the 16 remaining bytes contain information about the memory block (size, flags).
For tables of other types of variables :
char * array1 = (char *) ps_malloc (n_elements * sizeof (char)); // Create an empty array of n_elements characters
float * array = (float *) ps_malloc (n_elements * sizeof (float)); // Create an array of n_elements float number
We can also create arrays that are filled with zeros with
ps_calloc():
int n_elements = 20;
Serial.println((String)"PSRAM Size available (bytes): " +ESP.getFreePsram());
Serial.println("Array of integers initialized to 0");
int *array = (int *) ps_calloc(n_elements, sizeof(int));
Serial.print("[array] : ");
for(int i=0; i!= n_elements;i++){
        Serial.print((String)array[0] + " ");
}
Serial.println((String)"\nPSRAM Size available (bytes): " +ESP.getFreePsram());
Terminal output:
PSRAM Size available (bytes): 4194252
Array of integers initialized to 0
[array]: 0 0 0 0 0 0 0 0 0 0 0 0 0 0 0 0 0 0 0 0 0
PSRAM Size available (bytes): 4194156
Here are 2 ways to create 2-dimensional tables:
Example
int n_rows = 10;
int n_columns = 20;


void setup(){
        Serial.begin(115200);
        //Initialisation
        if(psramInit()){
                Serial.println("\nPSRAM is correctly initialized");
        }else{
                Serial.println("PSRAM not available");
        }

        //Create an array of n_elements
        int initialPSRAMSize = ESP.getFreePsram();
        Serial.println((String)"PSRAM Size available (bytes): " + initialPSRAMSize);
        //Creating a two-dimensional array with a one-dimensional array
        int *array2D = (int *) ps_malloc(n_rows * n_columns * sizeof(int)); // Create an array of n_rows x n_columns
        //To access the value located in row 5 to column 10
        int row_i = 5;
        int column_j = 10;
        array2D[column_j * n_columns + row_i] = 42;

        //Creating a two-dimensional zero-filled array with an array of pointers
        int **array2Dbis = (int **) ps_calloc(n_rows, sizeof(int *));
        for (int i =0; i!= n_rows;i++){
                array2Dbis[i] = (int *) ps_calloc(n_columns , sizeof(int));
        }
        //To access the value located in row 5 to column 10
        array2Dbis[row_i][column_j] = 42;


        int PSRAMSize = ESP.getFreePsram();
        Serial.println((String)"PSRAM Size available (bytes): " + PSRAMSize);
        int array2D_size = initialPSRAMSize - PSRAMSize;
        Serial.println((String)"Size of the array in PSRAM in bytes: " + array2D_size);

        //Delete 2D arrays
        free(array2D); //Allocated memory is freed.
        free(array2Dbis);
        Serial.println((String)"PSRAM Size available (bytes): " +ESP.getFreePsram());
}

void loop() {
}
Strings
Since a String is a chain of characters, it is just an array of type char :
int n_elements = 20;
char *str = (char *) ps_calloc(n_elements, sizeof(char)); //Create an array of n_elements null characters ('\0')
str[0] = '4';
str[1] = '2';
Note
The use of ps_calloc() is more interesting because it allows the ESP32 to detect the end of the string directly.
Here is an example sketch:
void setup() {
        Serial.begin(115200);
        if(psramInit()){
                Serial.println("\nThe PSRAM is correctly initialized");
        }else{
                Serial.println("\nPSRAM does not work");
        }

        int n_elements = 20;
        char *str = (char *) ps_calloc(n_elements, sizeof(char)); //Create an array of n_elements null characters ('\0')
        for(int i = 0; i < 10;i+=3){
                str[i] = '4';
                str[i+1] = '2';
                str[i+2] = '_';
        }
        Serial.println(str);
}
Terminal output:
The PSRAM is correctly initialized
42_42_42_42_
Html/Json
Here is an example that allows you to download any text file, such as HTML pages or JSON files (under 4 MB) and store it in PSRAM.
#include <WiFi.h>
#include <HTTPClient.h>
#define TIMEOUT 5000

const char *ssid = "yourNetworkName";
const char *password = "yourNetworkPassword";
const char *url = "https://en.wikipedia.org/wiki/ESP32";

void setup() {
    Serial.begin(115200);

    // Connect to WiFi
    WiFi.begin(ssid, password);
    while (WiFi.status() != WL_CONNECTED){
        delay(100);
        Serial.print(".");
    }
    Serial.print("\nConnected to WiFi with IP :");
    Serial.println(WiFi.localIP());

    char *page = (char *) ps_malloc(sizeof(char));
    int lengthHtml = 0;
    HTTPClient http;
    http.begin(url);
    http.useHTTP10(true); // Allow to try to having a Content-Length in the header using HTTP1

    Serial.println((String) "Try GET "+ url);
    int httpCode = http.GET();
    if (httpCode > 0){
            // Displays the response HTTP code of the GET request
            Serial.printf("[HTTP] GET... code: %d\n", httpCode);

            // If the file exists (HTML, JSON, ...)
            if (httpCode == HTTP_CODE_OK){
                // Try to get the file size ( -1 if there is no Content-Length in the header)
                int tempLength = http.getSize();
                Serial.println((String) "Content Length :" + tempLength);

                // Storing the page in PSRAM
                Serial.printf("Adresse mémoire de la page : %p \n", page);

                // Get the TCP stream
                WiFiClient *stream = http.getStreamPtr();

                //Initialize buffer position in PSRAM
                int position = 0;

                uint32_t currentTime = 0;
                uint8_t timeoutArboted = 1;

                // Retrieves all data from the file
                while(http.connected() && (tempLength > 0 || tempLength == -1)){

                        // Retrieves available data (data arrives packet by packet)
                        size_t size = stream->available();
                        if (size){
                                page = (char*) ps_realloc(page, position + size + 1);
                                stream->readBytes(page+position, size);
                                position += size;

                                if (tempLength > 0){
                                        tempLength -= size;
                                }

                                timeoutArboted = 1;
                                }else{
                                        //If we don't know the size of the file, we assume that all data are received before the timeout
                                        if(timeoutArboted){
                                                //Launches the timer
                                                currentTime = millis();
                                                timeoutArboted = 0;
                                        }else{
                                                if(millis()-currentTime > TIMEOUT){
                                                        //We have reached the Timeout
                                                        Serial.println("Timeout reached");
                                                        break;
                                                }
                                        }
                                }
                        }

                        *(page+position) = '\0';

                        lengthHtml = position;
                        Serial.println((String)"Downloaded " + lengthHtml + " Octets");
            }
    }
    else{
            Serial.printf("[HTTP] GET... failed, error: %s\n", http.errorToString(httpCode).c_str());
    }
    //Closes the HTTP client
    http.end();
    delay(1500);
    Serial.println(page); // To display the entire HTML page

}
Terminal output:
...........
WiFi connected with IP : 192.168.43.7
Try GET https://en.wikipedia.org/wiki/ESP32
[HTTP] GET... code: 200
Content Length :117615
Memory address of HTML page in PSRAM : 0x3f800024
Downloaded 117615 Octets
<!DOCTYPE html>
<html class="client-nojs" lang="en" dir="ltr">
<head>
<meta charset="UTF-8"/>
<title>ESP32 - Wikipedia</title>
...
...
Note
You may notice that using the ArduinoJson library to download JSON files is much easier.